©2008, Sonia C. Jensen
|
Supplies
- 2" styrofoam ball
- 1" styrofoam ball
- Ball of yarn in any Christmas colour
- 2 googlie eyes
- 1/2" plain or sparkley pom-pom for nose
- Scraps of felt for collar and mouth
- 1 pipe cleaner the same colour as the yarn
- A 1" square small wrapped gift (purchased from dollar store or make your own by wrapping a small piece of foam)
- White glue
- Hot glue gun (parent will use this at the end)
- Skewer or knitting needle
- Scissors
|
|
|
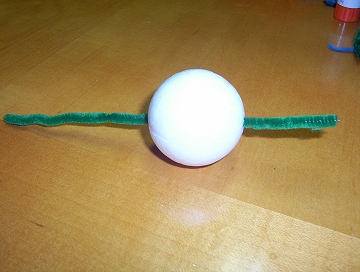
Step 1
- With the skewer or knitting needle, poke a hole through the middle of each styrofoam ball.
- Take the pipe cleaner and push it through the larger ball, leaving about 2" showing at the bottom of the ball.
|
|
|
Step 2
- Cut a small piece of yarn about 6" long
- Spread the fingers of one hand open wide
- Take the ball of yarn and wrap it around your open fingers 20 times.
- Slip the small piece of yarn through the middle and tie it off.
- Remove yarn from fingers and cut it so that you have long strands tied in the middle. This makes the arms.
- Cut 2 more small pieces of yarn and tie the ends of the arms to make "hands".
- Trim the yarn so that the "hands" are nice and neat, but not too short!
- Glue the arms to the BACK of the pipe cleaner, at the top of the styrofoam ball.
|

|
|
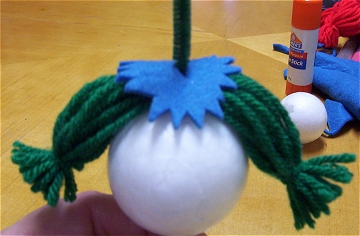
Step 3
- Take a small piece of felt, about 3" square and cut it into a circle to make the collar.
- Cut out little points at the edges of the circle to make a zig-zag effect.
- Cut a small slit in the middle of the collar.
- Put some glue on top of the arms, around the pipe cleaner
- Slip the collar over the pipe cleaner and push it down on top of the arms.
|
|
|
Step 4
- Slip the smaller styrofoam ball over the pipe cleaner and push it down on top of the collar
DO NOT glue the head down. You want it to be able to turn.
Can you see the snowman starting to take shape now?
|

|
|
Step 5
- Cut a small piece of yarn about 6" long
- Take the same hand you used before, but keep the fingers together this time.
- Wrap the yarn around your fingers 20 times
- Tie off the yarn with the small piece that you cut.
- Cut the yarn so that it is tied in the middle. This makes the snowman's hair
- Take the hair and play with it so that it is all messy
- Glue the hair onto the top of the snowman's head, around the pipe cleaner.
|

|
|
Step 6
- Take the part of the pipe cleaner that is sticking out of the top of the snowman's head and fold it over.
- Push the end of the pipe cleaner into the head. This forms the part that you will use to hang the snowman on the tree.
|

|
|
Step 7
- Fold the bottom of the pipe cleaner up to form a hook shape
|

|
|
Step 8
- Repeat Step 2 to form the legs
- Hang the snowman's legs over the hook that you made above.
|

|
|
Step 9
- Push the end of the pipe cleaner into the styrofoam ball, very close to the hole the pipe cleaner went into
|

|
|
Step 10
- Make sure to push the pipe cleaner in so that the legs are snug against the snowman's body
|

|
|
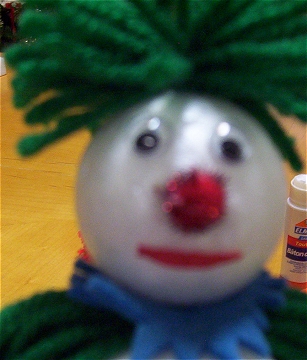
Step 11
- Glue on the googlie eyes and the pom-pom nose onto the snowman's face
- Cut a small piece of red felt or construction paper for a mouth and glue it in place
|
|
|
Step 12
- This is where an adult will use the hot glue gun and glue the present onto the snowman.
- With the glue gun, glue the hand onto the present
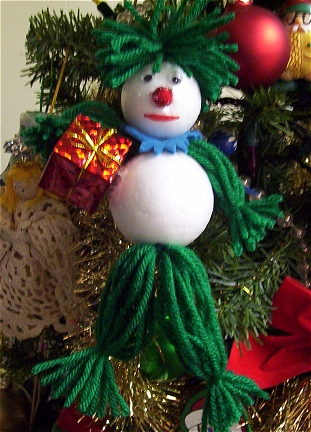
And that's it! You have now made a cute snowman craft! Well done!
|

|